I would like to start off by saying a couple of things:
This is not meant to be a guide as to how to set this all up, but more of an explanation as to how it works. You can contact me if you want some help building your own, but I find spaceinvaderone on youtube to be very helpful for this. He explains it set up much better than I could ever do,
It glosses over a lot of the difficulties of setup and some ‘unless you do this!’ type situations for the sake of simplicity. It is a very simplified version of the in and outs of Debbie for whoever is interested in knowing. I am by no means an expert in these categories, but I like to share the knowledge that I have.
But really, I could talk about these things forever and want to learn more so if you are also interested please talk to me 🙂
The last part of the setup is to be able to access this all away from home. When I am connected to my home network it is easy to connect between devices as it is simple to just type in another computer’s IP and start watching the media. When you want to connect from outside the house, it gets more complicated. You need to tell your device to connect to your house’s IP address, and then tell it to route your traffic to a certain computer in the house. This sounds easy, just open a port on your router that goes straight to the computer you want to connect to. This could work, but there is one downfall, your house network IP is most likely a dynamic IP. There are two types of IP’s assigned by your ISP (Internet Service Provider), dynamic and static. I won’t get too much into the difference between the two, but if you don’t know the difference it most likely is dynamic as static most of the time costs extra money. What this means, given the name dynamic, it has the ability to change. The frequency of change could be in a month, or a year, or possible never in the time you have the IP. All it means is that it can change. So clearly, giving an address to someone that is always changing is not the best thing to do. One solution to this is to use an IP address tracker. Essentially how this works is, I installed a program on Debbie that pings out into the world, and another computer receives it. Now that computer is able to reverse trace it and see where the ping came from and assigns a website link to it. In this case I use a free service called Duck DNS (DNS standing for domain name system), which tracks my house’s dynamic IP address. So instead of this changing series of numbers like 12.123.123.123 it makes it into [name].duck-dns.org. So every time you go to [name].duck-dns.org it goes to my houses IP. Essentially it takes the domain name, and turns it into an IP address, which is exactly what a domain name system does.
So now we have solved the issue of giving the right address, you could set it up where you just open a port on your router and let the traffic come in. Lets use an example case of, 12.123.123.123:4444. What this means is your IP address, 12.123.123.123, and then through a port, or you can think of it as a pathway number, 4444. Lets say on my computer I set up port 4444 to be plex, so now anyone with that address is able to access Plex! However, there are some security flaws with this.
You open up a hole in your router for others to access. Anyone with your IP address and that port can access the program. Of course, you can have a password to protect the program you are hiding, but it is better to not let other people in the world have access to this. It is common for hackers to set up bots to scan the world for people with open ports and then begin to brute force guess passwords.
The internet traffic leaving and coming into your house is not encrypted. This means that anyone who intercepts it can directly read what you are sending. So let’s say you password protected the program you are port forwarding. What good does that do if the next time you send it, someone was able to intercept and have the password for themselves?
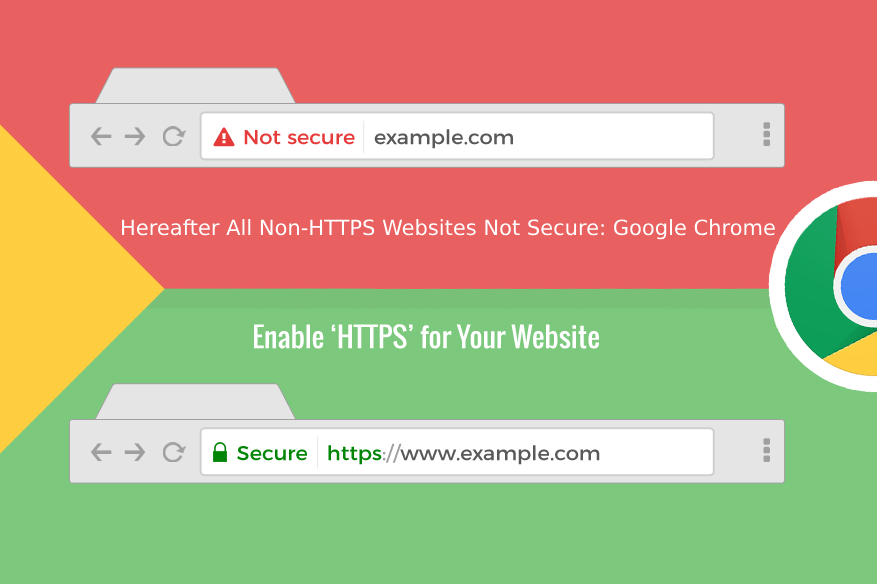
Again, this is all to protect some movies and TV shows that I have, but it is not difficult to set up some extra security so why not? What letsencrypt does it let you encrypt your traffic for free. This is the difference of going to a website and chrome saying “not secure” versus giving you the green lock sign.
Essentially, to encrypt the traffic you need an SSL certificate. Think of it as the key that locks up your internet traffic. It is a very long key…as in 256 bits long…(115,792,089,237,316,195,423,570,985,008,687,907,853,269,984,665,640,564,039,457,584,007,913,129, 639,936 combinations). This number is larger than the number of atoms in the percivable universe. Even with the world’s most powerful computer right now, would take millions of years to guess it, and it would cost more than the world’s GDP multiple times over to do so. SHA-256 encryption is the standard for major businesses and almost all websites around the world. Best of all, it can be done for free with letsencrypt. Normally you have to pay for an SSL-Certificate, but letsencrypt will simply renew one every 90 days for you. This prevents if someone was able to get a hold of it, it would not be valid once it changes.
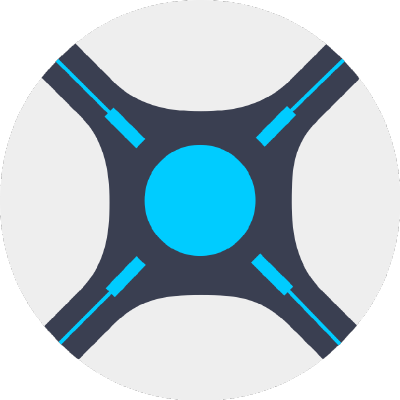
The last part to Letsencrypt is a reverse proxy. What a reverse proxy, in this case ran by NGINX, does is it hides the exact location that the internet traffic is going to.
Using the diagram above, how this works is that NGINX is able to handle redirecting the traffic to individual ports. The client is an outside device, your laptop, phone, etc. Now let us say it wants to connect to port 8989 which is what your Sonarr is hosted on. Normally as I have previously mentioned, you would open port 8989 on your router and it would work. Also as I said before was that opening ports are not a good thing, you want to minimize the number of ports you have open. What NGINX allows me to do is only open port 443 to listen for incoming traffic and NGINX will be able to handle directing it to the correct location.
Using a combination of the two dockers, I am able to securely get access to my server from outside my network, while minimizing the risks I take on by opening my home network to the public.
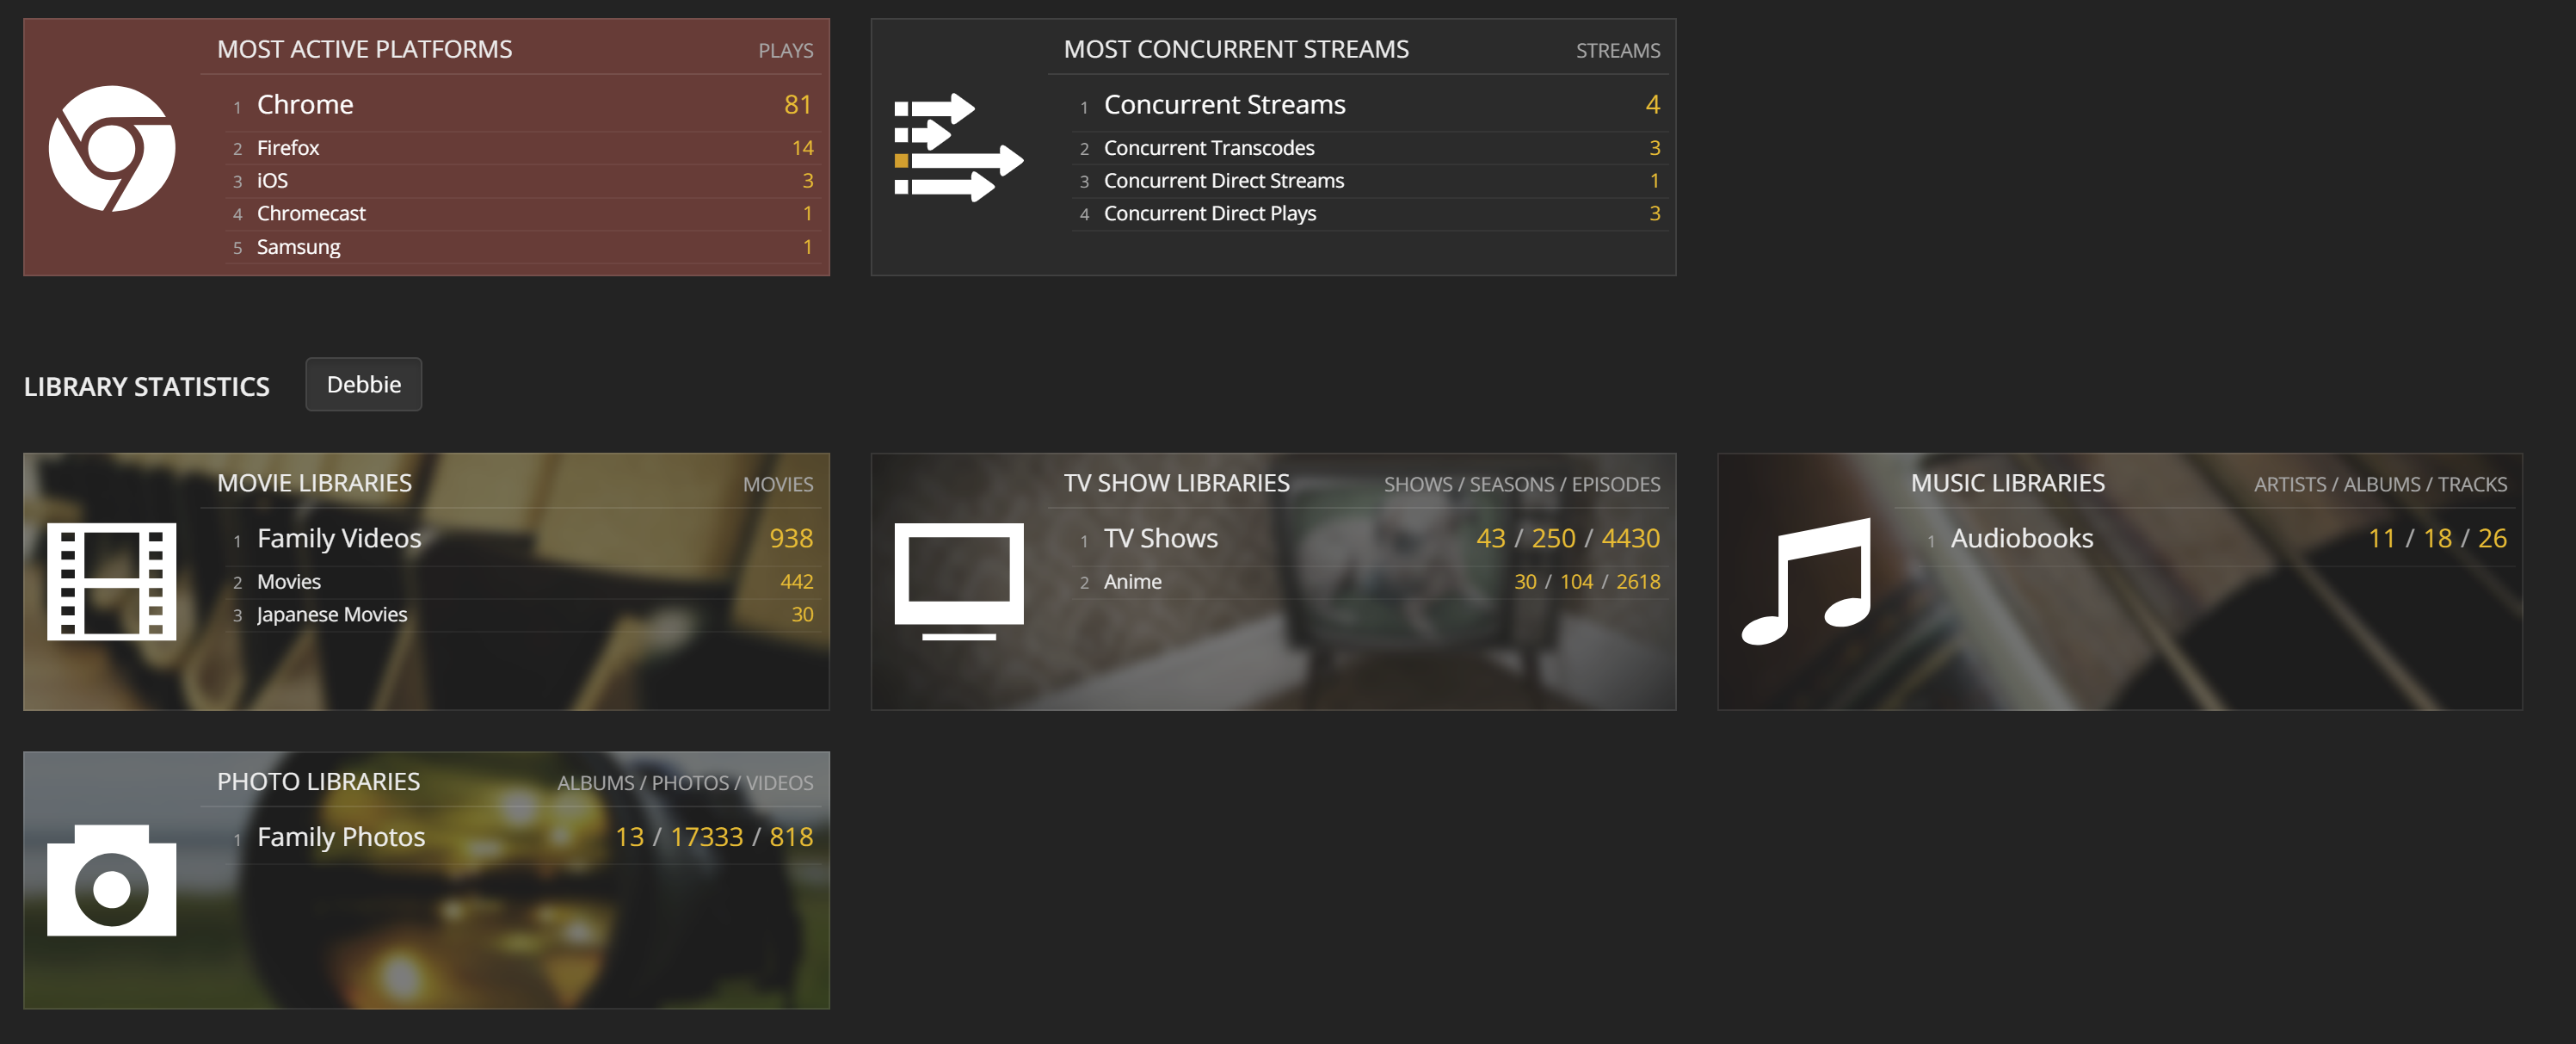
Tautulli is a GUI where I can monitor Plex users. It provides useful information to me such as devices, transcodes, bandwidth, watch history, and IP addresses. Although this sounds kind of creepy in a sense, it is fairly important to a server administrator to know such things. Knowing the number of transcodes is very important because it determines how many people can watch at once. I share my server with about 10 other people, but it could not handle 10 people at once (depending on what they watch), so it is good to know if I am hitting that limit or not. Knowing watch history and IP is important because I can tell if users are sharing their accounts or not. I do not allow account sharing because, it puts further strain on my server’s resources if one user is watching two streams at once, and it just increases their usage which increases the chance of high number of people watching at the same time. As I have mentioned previously, there are obvious ways to hide location using a VPN or other means, but I assume my users do not do this and using an IP location finder, I can see if they are watching for themselves or sharing (example, if someone is watching in California, then five minutes later watching in Texas). Tautulli also provides a good GUI with some fun information as well. At the time, this is what my Tautulli looks like for the amount of content I own
Ombi is a way for my Plex users to easily be able to request for new or missing this things to add to the server. Since my library is shared with multiple people, it gets tedious to constantly be responding to texts about which movie or show they want and then for me to log into Radarr or Sonarr to manually add it in, Ombi is able to handle this job. Ombi has a good search feature that uses IMDB databases to find the movie and once selected can automatically push it to Radarr or Sonarr if it is a movie of tv show respectively.
Additionally it gives some control as well. Once a user requests for content, I am able to approve or deny it. Ombi also has a good app on android so this makes it very easy to manage newly added content. The login for Ombi is pulled from the logins of Plex, so there is no need to create another account which increases the simplicity.
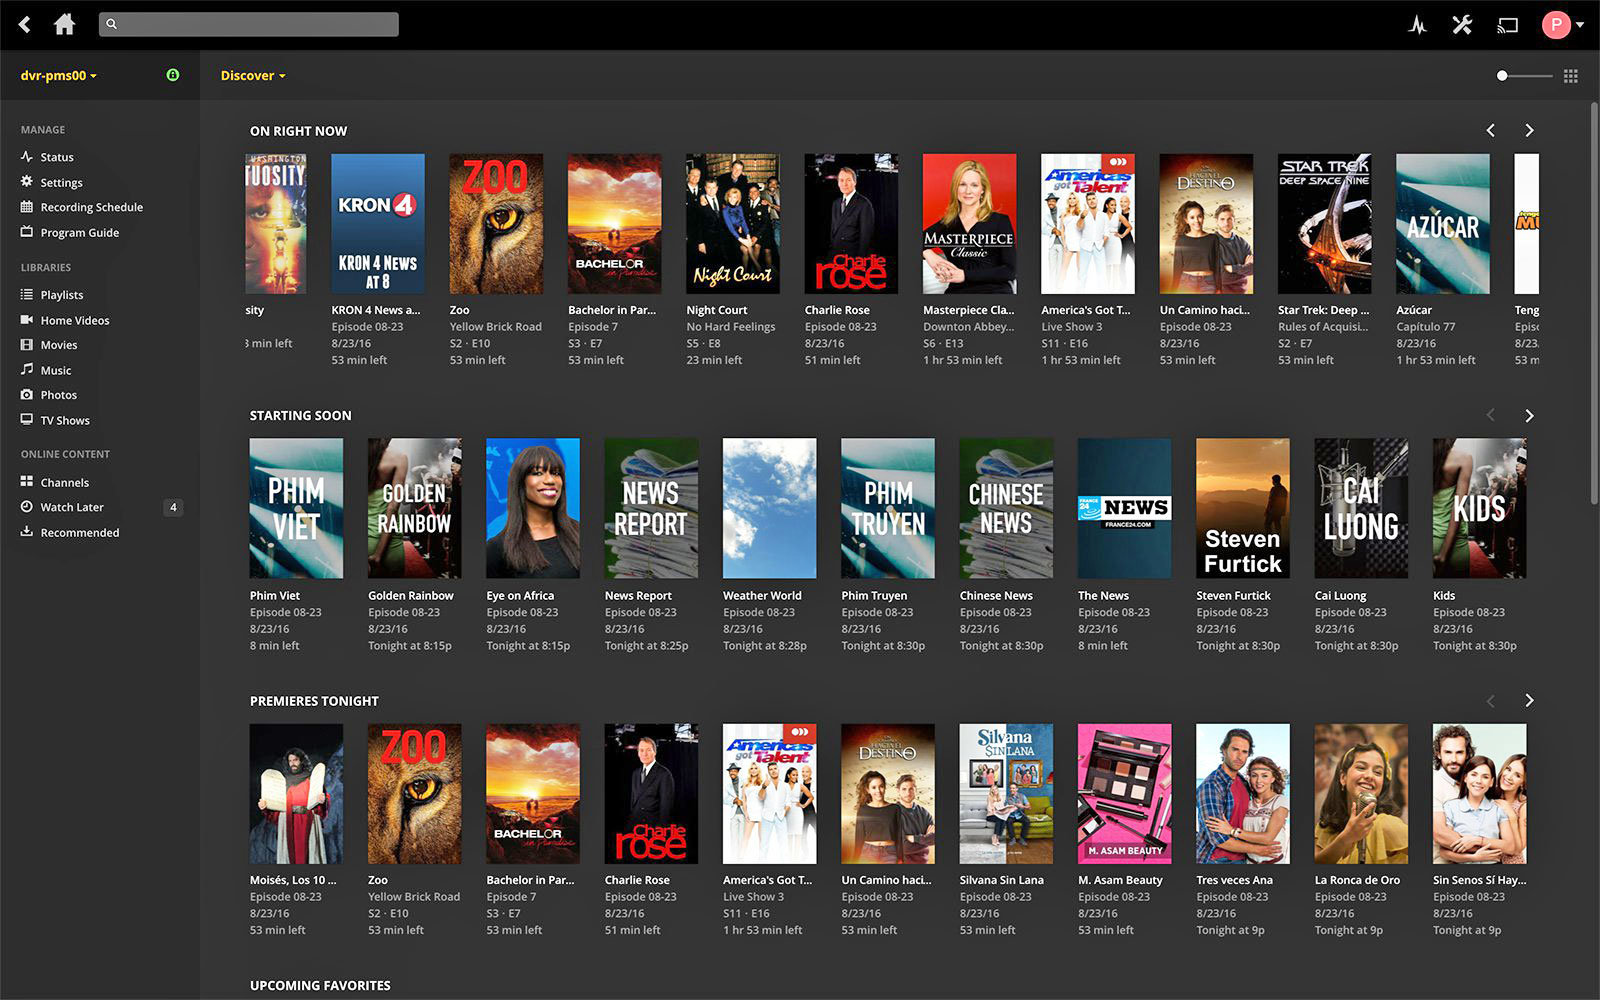
Plex is the core of why I set up Debbie. Plex is a user interface to easily see all your media. Normally, all the files are just stored in folders on my computer and it is, to be short, ugly. It makes it hard to decide and find what to watch looking through so many files. Plex can make some bland files look like this.
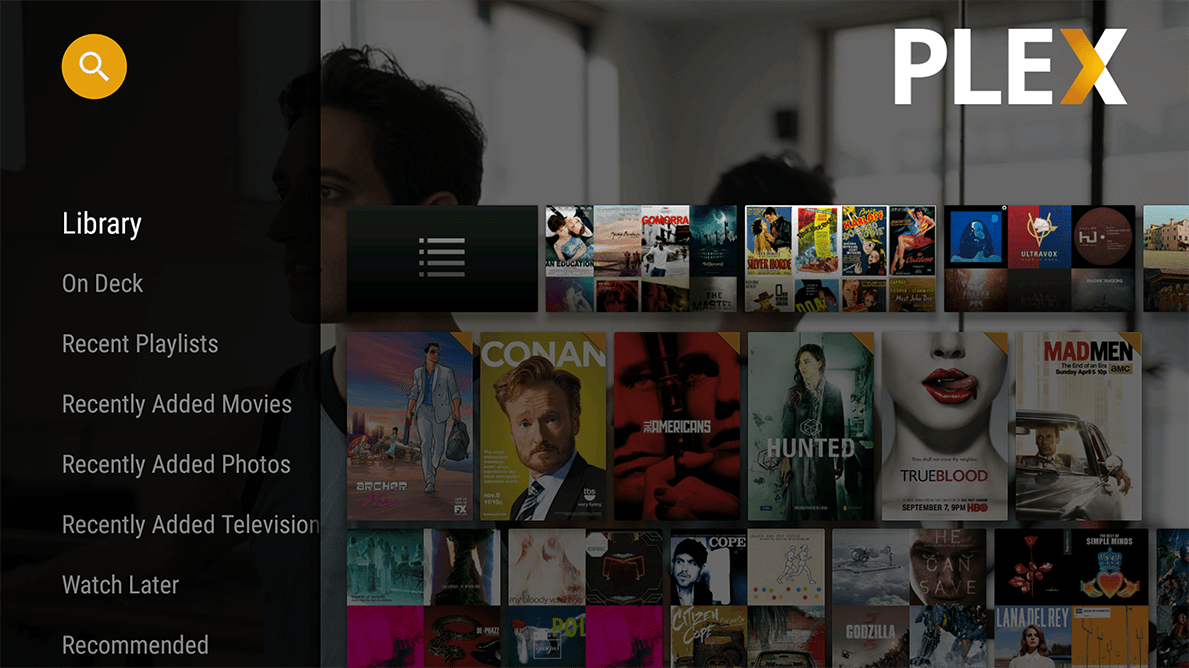
Or with different clients or devices it can look like this
This is all in comparison to what my folder structure looks like
It does this by determine what the show or movie is based on the file name and pulls data from other internet sources such as IMDB or TheTVDB to put it into the interface. Also this is also why it is important to have Sonarr and Radarr to be able to rename the files into clear names so it is easier for Plex to match the files with a movie or show
Additionally, what Plex is able to do is play any media almost anywhere. For example, lets say I have a 1080p mp4 movie that I want to watch on a device that does not support mp4 files. Plex will be able to determine which format type is best for that client and will live convert the file to what is best. Additionally, it can also change the quality of the video to suit the client’s internet speed (example, converting a 1080p video into 480p). This is all done in the background and can be done with one click of a button in the Plex interface. This process of changing file types is called transcoding and is not done magically, it requires processing power. That is why I built Debbie with dual Xeons. They are not clocked very fast, but have a lot of processign power, so it can handle multiple people watching at the same time.
My favorite feature is also how easy it is to share my library with others. With one invite link, other users are able to join my library and watch from their own devices. But best of all, it’s completely free! The core functionality to watch media on all your devices is free with no ads. You can, however, pay for some premium features such as downloading or watch on mobile but it is completely not necessary. I did purchase a premium lifetime subscription to support the developers and get some of those premium features since I use it so much. The premium features can also be shared with other family members so I thought it was worth the buy.
After setting up a way to download media, Sonarr and Radarr allow me to automatically select which files to download and organize the files. If you manage a small media server, it would be easy to go to a torrent indexer, my favorite being Rarbg (Possible NSFW), and clicking each download. When selecting which torrent to download there are a couple of things to consider, size, quality, seeders, and language. Rarbg is a good indexer because is has all this information available which makes it easy to select a good torrent. It also has a good community of posting higher quality videos. Of course, for a couple of movies, it is easy to just search and click, but my movie library consists of over 400 movies and 7000 TV show episodes so it could clearly get tedious doing this all manually. Essentially Radarr and Sonarr are able to do this automatically for me by searching the Rarbg lists while taking into consideration parameters set by me such as size, quality, seeders, and langauge
The other thing Radarr and Sonarr are able to do is to be able to manage the downloading after selecting the one to download. After it selects the one to download, it sends it to Deluge to begin torrenting. Then, Deluge torrents the file and once it is done, Sonarr and Radarr are able to move the file back from Deluge to my media folders and rename them with the useful information such as name, year, and quality. It will also remove the file from deluge, but I have set it up where it will seed for 3 days before deleting to help out others where are also trying to torrent it.
First and foremost, there needs to be a way to download media from the internet. The most common way to download something from the internet would be to host a file on a server, and a client downloads it to their computer. Although this is the most common, there are a couple of disadvantages.
The bandwidth is limited to however fast the server is
The file must be hosted in one place with fast internet and lots of bandwidth if trying to service a large amount of people
These types of services such as cloud services are usually privately owned, which means they can see what you are sharing and see other private information
This is not to say that downloading from a trusted server is a bad idea, there are many advantages to this such as security and reliability. Torrent comes into play when people want to transfer files between others that one would not want private entities or government agencies to know of.
The way torrenting works is by directly transferring the file between two people. For example, if John and Sara want to share a picture, instead of John adding it to a cloud service and then sharing it with Sara he can directly share it through torrenting. In this case, Sara would be directly downloading the file off of John’s computer with no middle man. Now let’s say, that this file John got from Joe, who got it from Sam, who got it from Jane. So in this made up world, the one picture exists on John’s, Joe’s, Sam’s, and Jane’s computer. Torrenting would allow Sara to download the same picture from all 4 of these people silmultaneously, which in theory would be 4 times the speed. I say in theory because it depends on one’s internet speed. If everyone that owned the picture had blazing fast internet and Sara had terrible internet, she could only download it as fast as her inetnet would allow her. On the other hand, if the 4 people who owned the picture have terrible internet and Sara had blazing fast internet now she would be at an advantage! If she downloaded straight from John lets say it would be 4Mbps, and all of the others that own the same file have the same internet speed. If Sara downloaded from all 4 of these people she could get a theoretical 16Mbps instead of the 4Mbps that she would have downloaded directly from John. Each person downloading is called a seeder, so the more seeders the stronger the torrent is considred. Additonally now she will be able to share the file with others using her faster ineternt to help others who would want the picture as well.
Additionally, not only is there a speed advantage to be had but also the lack of a centralized server. In the previous example, if you noticed the picture was shared using peer to peer sharing or P2P for short. Additionally, each host does not even need the whole picture. Lets say John has the top half of the picture and Joe has the bottom half of the picture, then Sara would still be able to have the full picture. This is advantageous because if someone were to search John’s or Joe’s computer they would not be able to see that they owned this picture, it would look like a bunch of broken bits of a file. Of course, this is an oversimplification, but essentially each file is broken down into tiny bits for everyone to share and the torrent client is able to source the pieces and put them together in the order they should be. The torrent client I use is deluge with an additional vpn
The VPN part of the name refers to Virtual Private Network. This allows me to have a layer of anonymity to the internet. Although it can be seen as an advantage, directly connecting to someone else’s computer is also a disadvantage. This is because, I need the person who I am downloading from’s IP address and they need mine. Having your IP address open might not directly be a security risk, but adds a source of vulnerability to your network that is not needed. Additionally, many ISPs (Internet Service Providers) do not want you to torrent. VPNs allow you to keep your IP address private. The way it works is by sending your internet traffic to another computer then to its final destination. This way if the reciever were to want to find your IP by tracing back where it got the files from, they would see as if your internet traffic came from the middle man’s computer. (There are instances were governments and other entities were able to ask the middle man for their logs which could contain info about your internet traffic and IP, but that is why it is important to pick a good ‘middle man’ and possibly one located in a country like Panama where the US (and almost all other countries) has no jurisdiction and would be extremely difficult to pursue an investigation there. Of course I really doubt anyone would want to spend that much effort into seeing what movie I downloaded last.
Just to prove how easy it is to see what one has torrented, there is a website, where it will use your IP to see what has been torrented with that IP. It is a little creepy how easy it is to see this information. I use Private Internet Access (PIA) because they do not keep logs, have a good history of privacy and support port forwarding which makes torrents download faster. Most importantly for me, it is cheap. A VPN in combination with a torrent client is a good way to download content from the internet anonymously.
This build was for a family friend. He wanted a complete gaming setup with all necessary peripherals for less than $1000. Unfortunately, it was at a time when both RAM and GPUs were at an all-time high. This is the reason for the choice of only 8GB of ram. I felt that having the extra storage was more beneficial for his usage which consists of light gaming. He mostly plays lighter e-sports titles like Fortnite and Overwatch. Additionally RAM is always much easier to upgrade than a GPU, so I made the decisions to get the best GPU possible for the budget. I felt that anymore powerful of a GPU, then the CPU would become a bottleneck. In the end, I was able to get him a complete setup under his budget and still came with some red LEDs.
This build was for an upgrade for a pre-built to a case that could accommodate a GPU and for Krystal at home. The CPU, motherboard, and RAM were taken from the pre-built. The goal was to be able to run basic VR games, mainly Beat Saber. The build is noticeably bottle-necked for VR by the old CPU. Additionally, Krystal is trying record with OBS and it is affecting frame rates considerably. The next upgrade will definitely be the CPU.
This build was based around the i7-6700 that was taken from a pre-built that was being underutilized at home. I really do not play any games and is completely overkill for my needs, but I like to have it for the few times I play games. The GTX 1080 handles running e-sport games at 4k well, but more intense open world games it tends to struggle. It is my personal computer that I use at Rutgers.